Knowledge Base
With a code repository, you can quickly build an enterprise or personal knowledge base.
Upload documents to the repository and configure the knowledge base pipeline. The system will automatically perform document chunking, tokenization, vectorization, and other processing, making the content available for page Q&A, Open API, and other scenarios to quickly build RAG (Retrieval-Augmented Generation) applications.
Knowledge Preparation
Understand the workflow for building a RAG application
The diagram below shows how to build a RAG application in two steps with the Cloud Native Build knowledge base plugin.
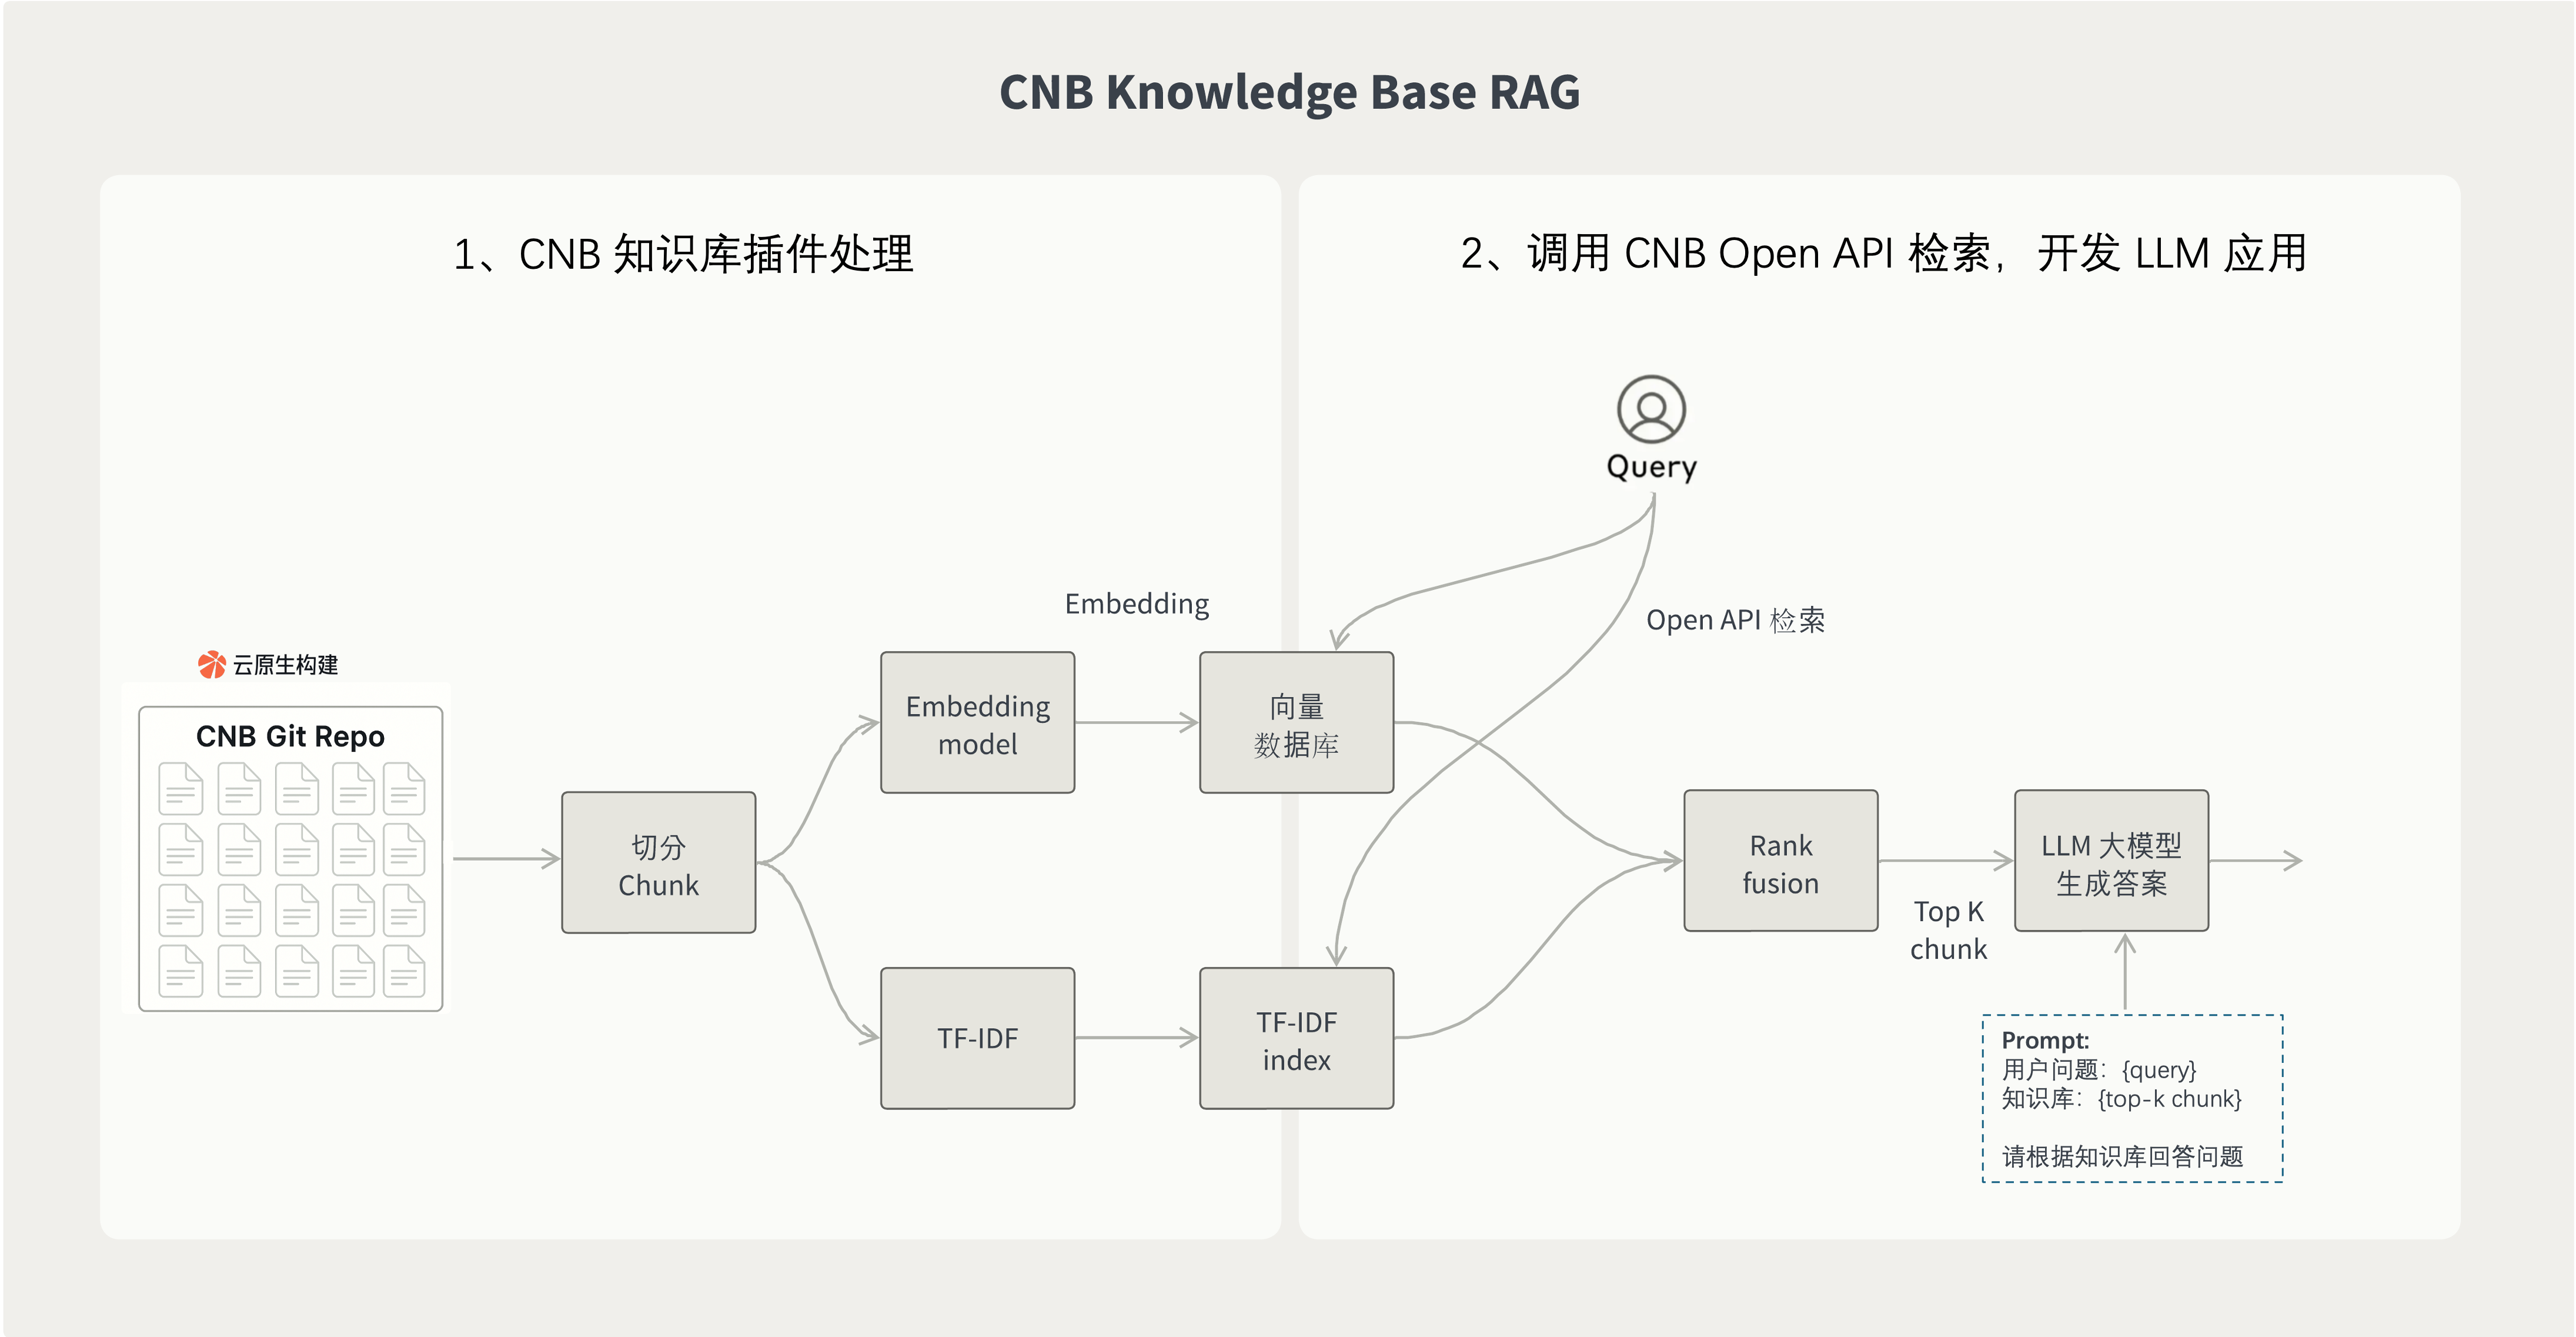
1. Import repository content into the knowledge base with the plugin
After you use the Cloud Native Build knowledge base plugin, documents, Issues, and other repository content are automatically imported into the knowledge base.
The plugin runs in the Cloud Native Build pipeline and automatically performs document chunking, tokenization, vectorization, and other processing. Once the knowledge base is built, it can be used directly by downstream LLM applications.
2. Use Cloud Native Build Open API for retrieval and answer generation
After the knowledge base is built, you can retrieve content through the Cloud Native Build Open API and combine it with an LLM model to generate the final answer.
A typical RAG application workflow looks like this:
- The user asks a question.
- After understanding the question, use Query to retrieve relevant document snippets from the knowledge base.
- After obtaining the retrieval results, combine the "user question + knowledge context" into a Prompt, for example:
User question: {User Question}

Knowledge Base:
{Retrieved Content from the Knowledge Base}

Please answer the user's question based on the knowledge base.- Send the combined Prompt to the LLM model, generate the answer, and return it to the user.
How to Use
Step 1: Use the knowledge base built-in task in the pipeline
Configure the pipeline in .cnb.yml and use the knowledge base built-in task. When code is pushed to the main branch, the pipeline is triggered automatically, processing documents, Issues, and other content through chunking, tokenization, vectorization, and other steps, then uploading the results to the knowledge base.
The following is the simplest configuration example, specifying only the file types to include:
main:
  push:
    - stages:
        - name: build knowledge base
          type: knowledge:update
          options:
            include: "**/**.md"
            # exclude: ["node_modules/**", "dist/**"]       # Exclude directories from indexing
            # issueSyncEnabled: true                          # Sync Issues (enabled by default)
            # chunkSize: 1500                                 # Chunk size (default: 1500)
Some built-in task parameters are listed below. For more details, see the knowledge:update built-in task documentation.
include: Specifies the files to include, using Glob patterns. The default is**/**.md, and arrays or comma-separated values are supported.exclude: Specifies the files to exclude, using Glob patterns. By default, nothing is excluded, and arrays or comma-separated values are supported.chunkSize: Specifies the text chunk size. The default is1500.chunkOverlap: Specifies the number of overlapping tokens between adjacent chunks. The default is0.embeddingModel: Specifies the embedding model. The default ishunyuan. Currently, onlyhunyuanis supported.issueSyncEnabled: Whether to enable Issue synchronization. The default istrue. When enabled, repository Issues are automatically fetched and added to the knowledge base.issueState: Sync only Issues in the specified state. By default, all states are included. Valid values areopenandclosed.issueLabels: Sync only Issues with the specified labels. By default, all labels are included. Arrays or comma-separated values are supported.issueExcludeLabels: Exclude Issues with the specified labels. By default, no Issues are excluded. Arrays or comma-separated values are supported. When overlapping withissueLabels, exclude takes priority.forceRebuild: Whether to delete and rebuild the knowledge base. The default isfalse.ignoreProcessFailures: Whether to ignore document processing failures. The default isfalse. When set totrue, the knowledge base is still updated even if some files fail to be processed.
Step 2: Use the knowledge base through Open API
After the knowledge base is built, you can query and retrieve content through Open API, then combine it with an LLM model to generate answers.
Before you begin, please read the CNB Open API Usage Guide.
The access token must have repo-code:r permission (repository read permission).
Tip
{slug} needs to be replaced with the repository slug.
For example, if the repository URL of the official documentation knowledge base is https://cnb.cool/cnb/feedback, then {slug} is cnb/feedback.
API Information
- URL:
https://api.cnb.cool/{slug}/-/knowledge/base/query - Method:
GET
Request Parameters
Pass the following parameters via the URL query string:
query:String, required. The keyword or question to query.top_k:Number, default5. The maximum number of results to return.score_threshold:Number, default0. The relevance score threshold for matches.
cURL request example:
curl -G "https://api.cnb.cool/cnb/feedback/-/knowledge/base/query" \
  -H "accept: application/json" \
  -H "Authorization: Bearer ${token}" \
  --data-urlencode "query=Workspace configuration for custom buttons"
Response Content
The response is in JSON format and contains an array of results. Each result contains the following fields:
score:Number, the relevance score, ranging from 0 to 1. A higher value indicates a better match.chunk:String, the matched knowledge base content.metadata:Object, the content metadata.
The metadata fields are as follows:
hash:String, the unique hash value of the content.name:String, the document name.path:String, the document path.position:Number, the position of the content in the original document.score:Number, the relevance score. A higher value indicates a better match.
Response example:
[
  {
    "score": 0.8671732,
    "chunk": "This cloud-native remote development solution is based on Docker...",
    "metadata": {
      "hash": "15f7a1fc4420cbe9d81a946c9fc88814",
      "name": "vscode",
      "path": "docs/vscode.md",
      "position": 0,
      "score": 0.8671732,
      "type": "code",
      "url": "https://cnb.cool/cnb/docs/-/blob/3f58dbaa70ff5e5be56ca219150abe8de9f64158/docs/vscode.md"
    }
  }
]
After you get the response, you can combine it with an LLM model to generate an answer.
RAG Mini App Example
Below is a simple RAG application example implemented in JavaScript:
import OpenAI from 'openai';

// Configuration
const CNB_TOKEN = 'your-cnb-token'; // Replace with your CNB access token, requires `repo-code:r` permission
const OPENAI_API_KEY = 'your-openai-api-key'; // Replace with your OpenAI API key
const OPENAI_BASE_URL = 'https://api.openai.com/v1'; // Or your proxy URL
const REPO_SLUG = 'cnb/feedback'; // Replace with your repository slug

// Initialize OpenAI client
const openai = new OpenAI({
  apiKey: OPENAI_API_KEY,
  baseURL: OPENAI_BASE_URL
});

async function simpleRAG(question) {
  // 1. Query the CNB knowledge base
  const params = new URLSearchParams({ query: question });
  const response = await fetch(`https://api.cnb.cool/${REPO_SLUG}/-/knowledge/base/query?${params}`, {
    method: 'GET',
    headers: {
      'Authorization': `Bearer ${CNB_TOKEN}`
    }
  });

  const knowledgeResults = await response.json();

  // 2. Extract knowledge content (here we assume all results are used)
  const knowledge = knowledgeResults
    .map(item => item.chunk)
    .join('\n\n');

  // 3. Call OpenAI to generate the answer
  const completion = await openai.chat.completions.create({
    model: "gpt-4.1-2025-04-14",
    messages: [
      {
        role: "user",
        content: `Question: ${question}\n\nKnowledge Base: ${knowledge}\n\nPlease answer the question
          based on the knowledge base.`,
      },
    ],
  });

  return completion.choices[0].message.content;
}

// Usage example
const answer = await simpleRAG("How do I develop a plugin?");
// Output the answer combined with the knowledge base
console.log(answer);
Enable the Knowledge Base in AI Conversations
After the knowledge base is built, you can enable it in the AI conversation feature on the repository page so the AI can answer based on repository documents.
For further customization, you can use .cnb/settings.ymlUI Customization Configuration File:
- Import configurations from other repositories
- Define different AI roles
- Customize the knowledge base button style
- Set the default repository and default role
All of the above are configured through the npc section in .cnb/settings.yml:
npc.imports.list: Import knowledge bases from other repositoriesnpc.roles: Define AI roles, for example:- Junior Engineer: Explains concepts simply
- Mid-Level Engineer: Provides professional technical answers
- Senior Engineer: Solves complex problems with architectural design insights
npc.button: Name, description, and hover image of the knowledge base buttonnpc.defaultRepo/npc.defaultRole: Default repository and role
See the UI Customization Configuration File for full syntax.
Mention AI roles in comments
In the default branch of the repository where the AI role belongs, you can define the pipeline configuration triggered when the AI role is @ mentioned in .cnb.yml.
In Issue or PR comments in other repositories, you can also @ an AI role defined in NPC. This triggers an NPC event, and Cloud Native Build uses the .cnb.yml file above as the pipeline configuration for the current NPC event.
For more details, see NPC Events.