Configuration File
Introduction
The configuration file defines the build tasks and step operations to execute when specific events occur in the code repository (such as pushing a new commit or creating a pull request).
Configuration File Specifications
File Standards
- The file is named
.cnb.ymland is stored in the root directory of the code repository, following the Configuration as Code principle. - Configuration changes can be managed through the Pull Request process, suitable for open-source collaboration.
- The build process is version-controlled alongside the source code, ensuring transparency and traceability of changes.
- The file is named
Advantages of YAML Format
- Supports nested structures and key-value pairs, clearly expressing complex configurations.
- Easy to extend and modify, adapting to dynamic needs, with comments to enhance collaboration efficiency.
For more details, see the Syntax Manual and Trigger Rules.
Example Configuration
Here is an example of a Cloud Native Build configuration:
main:
  push:
    - docker:
        image: node:22
      stages:
        - name: install
          script: npm install
        - name: test
          script: npm test
Example Workflow Description
- Trigger Condition: A build is triggered when a
pushevent occurs on themainbranch (i.e., a new commit is pushed to the main branch). - Execution Environment: The
node:22Docker image is used as the task execution environment. - Task Steps:
- Execute
npm installto install dependencies. - Execute
npm testto run tests.
- Execute
Basic Syntax Structure
The basic structure of the configuration file is as follows:
Array Form (Recommended):
main:
  push:
    - name: push-pipeline1
      stages:
        - script: echo 1
    - name: push-pipeline2
      stages:
        - script: echo 2
Object Form:
main:
  push:
    push-pipeline1:
      stages:
        - script: echo 1
    push-pipeline2:
      stages:
        - script: echo 2
Where:
mainrepresents the branch name.pushandpull_requestrepresent trigger events.- An event can contain multiple
pipelines(supporting both array and object syntax), which are executed concurrently. - A single
pipelinecontains a set ofstagesthat are executed sequentially within the same build environment (physical machine, virtual machine, or Docker container).
For more detailed syntax instructions, refer to: Syntax Manual
Configuration File Version Selection
The rules for selecting the configuration file version are the same as for Code Version Selection.
Syntax Checking and Auto-Completion
VSCode
It is recommended to use the Cloud Native Development environment to write configuration files, as it natively supports syntax checking and auto-completion, as shown below:
If developing locally in VSCode, configure it as follows:
Install the
redhat.vscode-yamlplugin.Add the following to the
settings.jsonconfiguration file:{ "yaml.schemas": { "https://docs.cnb.cool/conf-schema-en.json": ".cnb.yml", "https://docs.cnb.cool/tag-deploy-schema-en.json": ".cnb/tag_deploy.yml", "https://docs.cnb.cool/web-trigger-schema-en.json": ".cnb/web_trigger.yml", "https://docs.cnb.cool/settings-schema-en.json": ".cnb/settings.yml", "https://docs.cnb.cool/code-security-conf-schema-en.json": ".cnb/security/code_scan_config.yml" } }
Jetbrains
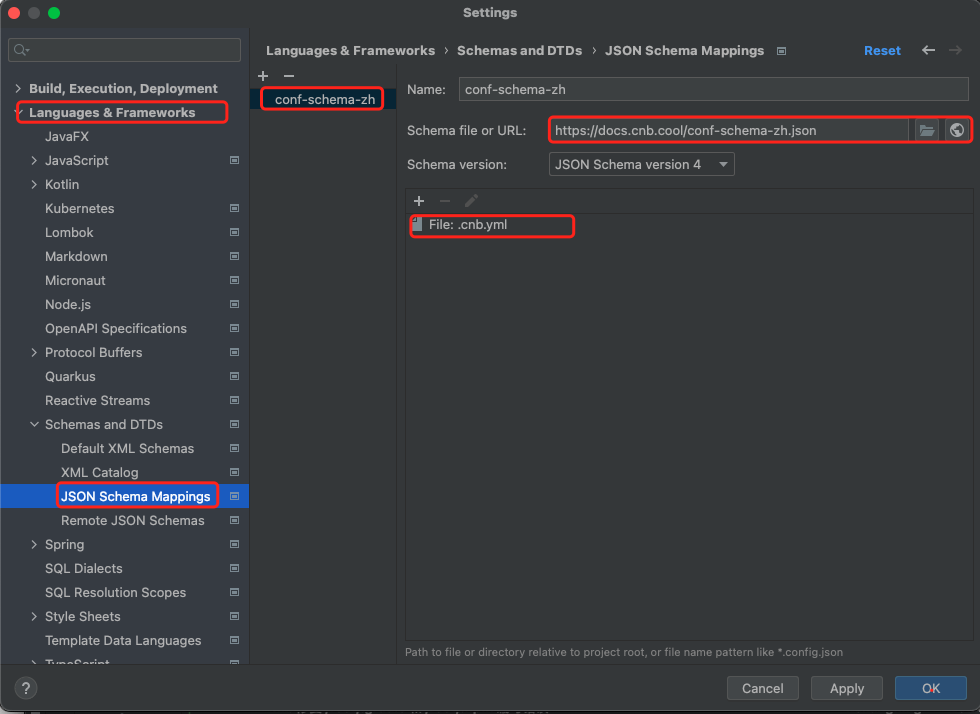
- Open
Settings/Preferences. - Navigate to
Languages & Frameworks->Schemas and DTDs->JSON Schema Mappings. - Click
+to add a new mapping. Add five mappings in total:https://docs.cnb.cool/conf-schema-en.json→.cnb.ymlhttps://docs.cnb.cool/tag-deploy-schema-en.json→.cnb/tag_deploy.ymlhttps://docs.cnb.cool/web-trigger-schema-en.json→.cnb/web_trigger.ymlhttps://docs.cnb.cool/settings-schema-en.json→.cnb/settings.ymlhttps://docs.cnb.cool/code-security-conf-schema-en.json→.cnb/security/code_scan_config.yml